Note
This page focuses on the Git version control system. For GitHub-related content, see GitHub Help and How to Contribute - OI Wiki.
Git is one of the most widely used version control systems today. OI Wiki also uses Git as its version control system.
Installation
See Git - Downloads.
Configuration
Git divides configuration files into different levels according to their scope. Two commonly used levels are1:
- A global configuration file applicable to the current user. This file is consulted whenever that user operates any repository on this system.
- A configuration file applicable to the current repository.
When multiple configuration files set the same option, the local setting automatically overrides the global setting. Therefore, if a particular setting is needed in a repository, simply change that repository's setting; this does not affect the global settings.
The git config command is used to modify configuration files.
Setting user information
After installing Git, the first thing to do is set your username and email address. This information is used on every commit.
$ git config --global user.name "OI Wiki"
$ git config --global user.email oi-wiki@example.com
Note
The username and email address shown here are for demonstration only. When configuring Git according to this page, remember to replace them with your own username and email address.
Here, --global indicates that the global configuration is being modified; the setting is therefore effective for all repositories belonging to the current user. If the --global option is omitted, the configuration file in the current repository is modified by default.
To modify a particular setting for a repository, simply run the command without --global in that repository.
Configuring the editor
$ git config --global core.editor emacs
The command above changes the editor to Emacs.
On Windows, Git's default editor can be selected during Git installation (see above). To change it later, enter the command above in Git Bash, replace the editor name with the editor's absolute path, and run the command.
Displaying configuration
git config -l lists all configuration parameters currently set. git config --global -l lists all global configuration.
Basics of repository operations
Creating a Git repository
Creating a Git repository is very simple: enter the following command in the folder where you want to create the repository:
$ git init
Git creates a .git folder in the current folder, and the repository is ready.
To clone a repository to your computer (for example, to copy OI Wiki's code locally for editing), use the git clone command:
$ git clone https://github.com/OI-wiki/OI-wiki
Remote repository URL
The repository URL given here is an HTTP(S) URL; that is, we connect to the remote repository using HTTP(S).
In fact, there are several other ways to connect to a remote repository. Connecting over ssh is more convenient and secure. We briefly introduce how to connect to a remote repository over ssh in the section “Managing remote repositories”.
The cloned repository is stored in a new folder under the current folder, with the same name as the repository. In this example, a new folder named OI-wiki appears in the current folder.
Tracking files
After making changes to files in a repository, those changes need to be included in version control.
Use git status to view the status of files in the current repository.
For example, after adding a README.md file to an empty repository, the result of running git status is as follows:
$ git status
On branch master

No commits yet

Untracked files:
  (use "git add <file>..." to include in what will be committed)

        README.md

nothing added to commit but untracked files present (use "git add" to track)
Here, Untracked files are files that Git has not previously included in version tracking. If a file is not tracked, changes to it are not recorded by Git.
The git add <文件> command includes the specified file in version tracking.
$ git add README.md # Add this file to version tracking
$ git status
On branch master

No commits yet

Changes to be committed:
  (use "git rm --cached <file>..." to unstage)

        new file:   README.md
README.md is now tracked and has been placed in the staging area. Next, simply run git commit to commit this change.
Before doing that, however, let us make a small change to README.md.
$ vim README.md # Make some arbitrary changes
$ git status
On branch master

No commits yet

Changes to be committed:
  (use "git rm --cached <file>..." to unstage)

        new file:   README.md

Changes not staged for commit:
  (use "git add <file>..." to update what will be committed)
  (use "git restore -- <file>..." to discard changes in working directory)

        modified:   README.md
You will find that README.md is simultaneously in the staging area and outside the staging area. In fact, being in the staging area applies to changes, not to files: the earlier change to README.md has been staged, while the later change has not. If git commit is run at this point, only staged changes are committed; unstaged changes are not.
Git gives a prompt saying that running git add README.md will place the unstaged changes in the staging area.
Put all changes in the staging area at once
The git add command places changes to specified files in the staging area.
In most cases, users prefer to put all changes in the staging area at once. The git add -A command can be used for this purpose. It places all changes (including files not yet tracked, but excluding ignored files) in the staging area.
If you only need to update tracked files without adding untracked files to the staging area, use git add -u.
Ignoring files
Sometimes we do not want to include certain files, such as executables, in version tracking. In this case, create a .gitignore file in the repository root and list the files to ignore in it. Git will not track those files.
For example, *.exe automatically ignores all files in the repository whose extension is .exe.
Now add the unstaged files to the staging area and commit all changes together.
$ git add README.md
$ git commit # The editor will open next; write the commit message
[master (root-commit) f992763] initial commit
 1 file changed, 2 insertions(+)
 create mode 100644 README.md
Now focus on the information for this commit.
master indicates that the current branch is master (branches are discussed in detail below). f992763 is the beginning of the SHA-1 checksum for this commit, followed by the commit message.
The SHA-1 checksum here deserves special attention: every checksum corresponds to a snapshot of the repository at a particular moment. This lets us access a repository snapshot from any point in history and make changes on that snapshot.
The next two lines describe the file changes involved in this update in detail.
Several options can also simplify the commit process:
-a: Put changes to all tracked files into the staging area before committing. Note that untracked files (newly created files) are not automatically added; they must be added manually withgit add.-m: This option is followed by the commit message and submits the changes with that message. For example,git commit -m "fix: typo"creates a commit titledfix: typo.
Viewing commit history
Use git log to view the commit history of a repository.
The commit history records the SHA-1 checksum, author, commit time, and commit message for every commit.
$ git log
commit ae9dd3768a405b348bc6170c7acb8b6cb5fe333e (HEAD -> master)
Author: OI Wiki <oi-wiki@example.com>
Date:   Sun Sep 13 00:30:18 2020 +0800

    feat: update README.md

commit f99276362a3c260d439364c505a7a06859f34bf9
Author: OI Wiki <oi-wiki@example.com>
Date:   Sun Sep 13 00:06:07 2020 +0800

    initial commit
Branch management
Why is branch management needed in version control? There are two main reasons:
- Directly changing the main branch not only makes the history confusing, but may also have dangerous consequences.
- Branches let us focus on the current task. If we need to complete two different tasks, we can simply create two branches; work on the two branches does not interfere with the other.
In Git, a branch is simply a pointer to a snapshot. On every commit, Git creates a snapshot for that commit and moves the current branch's pointer to that snapshot.
There is also a HEAD pointer, which points to the branch currently checked out.
Switching branches is, simply put, changing the HEAD pointer from the current branch to another branch. During this process, Git automatically updates the files so that the repository state after switching matches the snapshot pointed to by the target branch.
Creating branches
Use git branch to create a branch, git switch to switch branches, and git switch -c to create a branch and switch to it.
$ git switch -c dev # Create a new branch named dev and switch the current branch to dev
Switched to branch 'dev'
$ git branch # View the branch list
  master
* dev
The asterisk before dev indicates that dev is the repository's current branch; subsequent changes to this repository are recorded on this branch.
Try creating a new file, aplusb.cpp.
$ vim aplusb.cpp
$ git add aplusb.cpp
$ git commit -m "feat: add A+B Problem code"
[dev 5da093b] feat: add A+B Problem code
 1 file changed, 7 insertions(+)
 create mode 100644 aplusb.cpp
Now switch back to the master branch. aplusb.cpp disappears from the folder, and everything returns to the state just after the dev branch was created. You can continue other work on the master branch.
$ git switch master
Switched to branch 'master'
$ vim README.md # Make some small changes to README
$ git commit -a -m "feat: update README.md"
[master 5ca15f0] feat: update README.md
 1 file changed, 1 insertion(+), 1 deletion(-)
The following diagram explains the preceding operations.
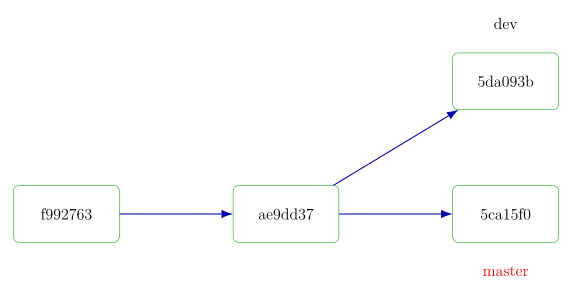
The master branch is highlighted in red, indicating that after these operations it is the current branch (the position pointed to by HEAD).
- Initially,
masterpoints to the snapshotae9dd37. - Next, a new
devbranch is created at the position ofmaster; it initially points to the same position as master. - Some changes are made on the
devbranch (creatingaplusb.cpp) and committed. After this commit, thedevbranch points to the snapshot5da093b. - After switching back to the
masterbranch,masterstill points toae9dd37andaplusb.cpphas not been created, so the file is absent from the repository. - Next, changes are made on the
masterbranch (updatingREADME.md) and committed, somasterpoints to5ca15f0.
Merging branches
When work on a branch is complete, it can be merged into another branch.
Continuing the example above, the work on dev is complete. Use git merge to merge that branch into the current branch (master):
$ git merge dev
Merge made by the 'recursive' strategy.
 aplusb.cpp | 7 +++++++
 1 file changed, 7 insertions(+)
 create mode 100644 aplusb.cpp
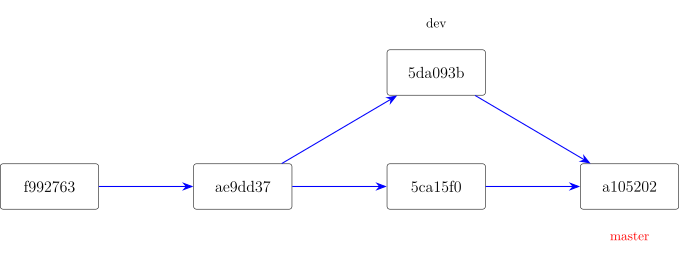
How exactly is this merge performed?
Before the merge, master points to 5ca15f0 and dev points to 5da093b; these two states are not on the same chain.
Git finds the nearest common ancestor of the two states (ae9dd37 in the diagram above) and merges the three snapshots. The result of merging the three snapshots becomes a new snapshot, and the current branch is made to point to it.
The merge itself is also a commit. Unlike an ordinary commit, however, a merge commit has more than one parent commit; it is the result of merging multiple commit states.
After the merge is complete, the dev branch has served its purpose. It can be deleted with the following command:
$ git branch -d dev # For an unmerged branch, use -D to force deletion
The merge process is not always this smooth. In some cases, a merge conflict may occur; this is discussed next.
Resolving merge conflicts
If different changes are made to the same part of the same file on two branches, Git cannot automatically merge the branches, resulting in a merge conflict.
Continuing the example above, suppose that after merging you create a readme-refactor branch from master to rewrite a README file. Due to an oversight, you also change the README files on both readme-refactor and master.
Initially, the README is:
# This is a test repo.

This repo includes some c++ codes.
The README on the readme-refactor branch is:
# Code Library

This repo includes some c++ codes.
The README on the master branch is:
# This is a code library.

This repo includes some c++ codes.
Running git merge readme-refactor now causes Git to report a merge conflict.
Run git status to see which files caused the conflict.
$ git status
On branch master
You have unmerged paths.
  (fix conflicts and run "git commit")

Unmerged paths:
  (use "git add <file>..." to mark resolution)

    both modified:      README.md

no changes added to commit (use "git add" and/or "git commit -a")
How can the conflict be resolved? For each file with a merge conflict, Git adds standard conflict-resolution markers. For example, opening the README.md file from this example shows:
<<<<<< HEAD
# This is a code library.
======
# Code Library
>>>>>> readme-refactor

This repo includes some c++ codes.
====== separates the contents of the two branches. The part between <<<<<< HEAD and ====== is the content of the HEAD pointer (the master branch), while the part between ====== and >>>>>> readme-refactor is the content of the readme-refactor branch.
Edit the text to resolve the conflict, delete the conflict markers, save the file, add the files to the staging area, and commit; the merge conflict is then resolved.
$ git add README.md # Add the file with the conflict to the staging area
$ git commit
[master fe92c6b] Merge branch readme-refactor into master
Other merge methods
By default, Git uses Merge to combine two branches. When branch B is merged into branch A with this method, all commits on B are included in A's commit history.
Git also provides two other ways to merge branches: Squash and Rebase.
Squash
When branch B is merged into branch A using Squash, all changes on B are combined into one commit on A.
Add the --squash option to git merge to use Squash:
$ git merge <branch> --squash
Note that after executing the command above, Git only stores all changes from B in A's buffer; you must then run git commit once more to complete the merge.
Squash can simplify the commit history, but loses information specific to each commit (the author of each commit, the changes in each commit, and so on), leaving only information about the merge as a whole (the author of each commit is listed in the commit message in the form "Co-authored-by"). If Squash and Merge is performed on GitHub, however, the original information can be viewed in the Pull Request.
Rebase
When branch B is merged into branch A using Rebase, each commit on B is added separately to A, rather than creating a merge commit as Merge does2.
First, switch to branch B, then rebase branch B onto branch A:
$ git checkout B
$ git rebase A
Now switch back to branch A and run git merge once to complete merging B into A:
$ git checkout A
$ git merge B
Rebase makes the commit history linear. Used correctly in appropriate situations, Rebase can produce better results than Merge. However, it changes the commit history, and conflicts are more likely both during Rebase and during subsequent merge operations. If used incorrectly, it may instead make the history disorderly. Therefore, Rebase is not recommended without a sufficient understanding of the operation.
Managing remote repositories
After completing changes locally, you may need to push them to a Git repository hosting platform such as GitHub. Repositories hosted on these platforms are remote repositories: you can obtain information from them and push your changes to them. Collaboration with others often depends on remote repositories, so learning to manage them is important.
Viewing remote repositories
Use git remote to view the list of remote repositories for the current repository.
If the current repository was cloned, it should have a remote repository named origin, whose URL is the URL used for cloning.
$ git remote
origin
To view detailed information about a remote repository:
$ git remote show origin
* remote origin
  Fetch URL: git@github.com:OI-wiki/OI-wiki.git
  Push  URL: git@github.com:OI-wiki/OI-wiki.git
  HEAD branch: master
  Remote branches:
    git             tracked
    master          tracked
  ...
Configuring remote repositories
Run git remote add <name> <url> to add a remote repository named name with URL url.
Run git remote rename <oldname> <newname> to rename the remote repository named oldname to newname.
Run git remote rm <name> to delete the remote repository named name.
Run git remote get-url <name> to view the URL of the remote repository named name.
Run git remote set-url <name> <newurl> to change the URL of the remote repository named name to newurl.
Fetching changes from a remote repository
Other people may push changes to a remote repository. Run git fetch to fetch those changes locally.
$ git fetch <remote-name> # Fetch changes from <remote-name>
Note that git fetch only fetches changes from the remote repository; it does not merge them into the local repository. To merge the changes, use git pull. By default, git pull is equivalent to git fetch followed by git merge FETCH_HEAD.
$ git pull <remote-name> <branch> # Fetch changes from <remote-name>, then merge them into HEAD
Pushing changes to a remote repository
After making changes, use git push to push them to a remote repository.
$ git push <remote> <from>:<to> # Push changes from the local <from> branch to <to> on <remote>
Depending on the remote repository, you may be asked to enter the remote account's username and password.
For a change to be pushed successfully, two conditions must hold: you have write permission for the repository (branch), and your branch is newer than the corresponding remote branch (that is, no one has pushed during the period in which you were making changes). If the remote branch has changes not present on the current branch, run git pull to merge them before pushing.
To force-push changes from a local branch to a remote repository, add the -f option. The remote repository's commit history is overwritten by the local commit history, so this command should be used with caution. It is better to use --force-with-lease, which overwrites only when the remote repository has not been updated. Note that “updated” here is relative to the previous fetch; if VS Code's Auto Fetch feature is enabled, you may not notice an update, making --force-with-lease as dangerous as -f.
Tracking remote branches
Setting a local branch to track a remote branch makes it easier to view the differences between them and simplifies interaction with the remote branch.
Before tracking, run git fetch <remote-name> to fetch the remote repository information locally.
Then run git switch <remote-branch>. Git automatically creates a new local branch named <remote-branch> and configures it to track the corresponding remote branch.
Note
Git automatically creates and configures this tracking branch only when the local branch does not exist and exactly one remote branch has a matching name.
Running git status now displays the difference between the current branch and the remote branch.
Because the local branch is configured to track a remote branch, the command for pushing to the remote branch is also simplified. Simply run git push to push changes on the local branch to its tracked remote branch.
For an existing local branch, it is also easy to set its corresponding remote-tracking branch. Run git branch -u <remote-name>/<remote-branch> on the current branch to make it track the remote branch <remote-name>/<remote-branch>.
Connecting over ssh
Compared with HTTP(S), connecting to a remote repository over ssh is more convenient and secure.
Before connecting over ssh, add an ssh key locally. Then upload the public key to the remote repository account.
Since this article is primarily a Git tutorial for OI Wiki contributors, we directly provide the tutorial from GitHub Docs for reference.
After completing the steps above, you can connect to the remote repository over ssh. The following command clones the OI Wiki repository over ssh:
$ git clone git@github.com:OI-wiki/OI-wiki.git
Pushing changes to a remote repository over ssh is similar to doing so over HTTP(S), but ssh avoids the process of authenticating with the remote repository account's username and password.
Git GUI Tools
For people unfamiliar with the command line, Git's pure command-line workflow may have a steep learning curve. GUI tools can reduce that difficulty to some extent. Compared with the command line, GUI tools also provide a better experience when viewing diffs and logs.
Git itself includes a GUI, and there are many excellent Git GUI tools, such as TortoiseGit3 for Windows users and Sourcetree4 for Windows and Mac.
Here we briefly introduce TortoiseGit. After downloading and installing TortoiseGit, right-click in the local repository directory to see Git's various functions in the context menu.
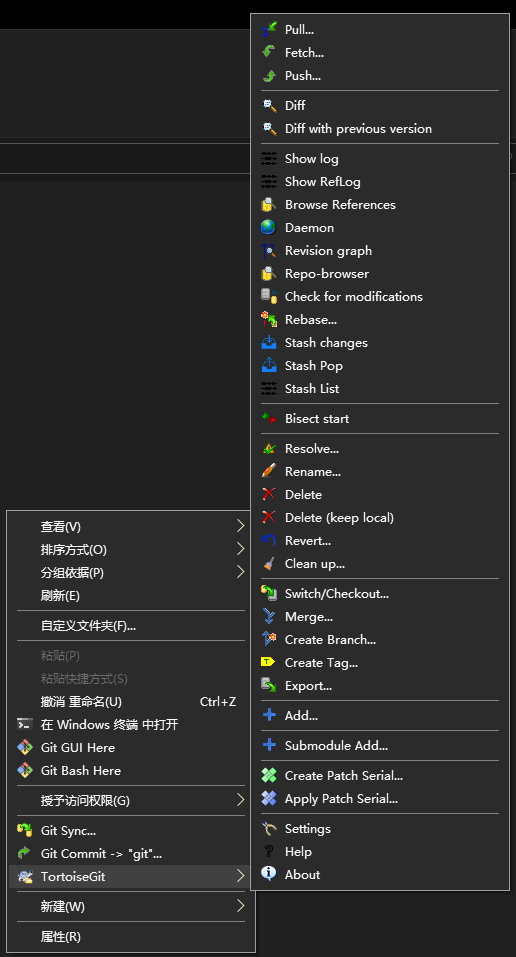
Detailed usage is omitted here; see the official documentation or learn through a search engine, for example TortoiseGit Manual.
Many GUI tools officially support Chinese, including Git Desktop and TortoiseGit. However, some translations still look awkward, so the English version is recommended.
External links
References and notes
Footnotes
-
In fact, Git also has a system-wide configuration file for every user and all repositories on the system. It has the broadest scope and a level above the user configuration file. Since this configuration is rarely used in practice, it is not discussed further here. ↩
-
Pro Git Book provides a diagram visualizing the Rebase process, which can help readers better understand how Rebase works. ↩