Introduction
Sublime Text (abbreviated as ST below, with a number appended to distinguish versions; if no number is given, the statement applies to all versions) is a lightweight text editor that supports syntax highlighting and code completion for many languages. It is highly extensible and provides a Vim mode; in particular, its hot-exit mode greatly reduces the possibility of losing files.
The version supported in the new NOI Linux is the final ST3 release, version 3.2.21, so this article focuses on ST3. The official ST4 release has now been published2; if ST3 is still being used, it will prompt you to update.
Important differences between ST4 and ST3 are noted separately. When a feature mentioned in the introduction already has a Chinese translation in ST3, that translation is used; otherwise, the English wording from ST4 is used.
Installation
For instructions on installing ST4, see the Sublime Text 4 download page.
For instructions on installing ST3, see the Sublime Text 3 download page.
Purchase Note
ST is paid software, but it offers an unlimited trial. The trial does not remove any functionality, although pop-up reminders to activate will appear from time to time.
Plugins and Customization
Chinese Localization
ST does not provide Chinese localization. To use it in Chinese, install a localization plugin.
Installing Package Control
After opening ST, press Ctrl+Shift+P to open the command palette, enter Install, and press Enter (the full command is Install Package Control, and the capitalization does not matter). You should then see an = moving continuously from left to right and back in the lower-left corner. A pop-up will report whether Package Control installation completed or failed; the exact loading time depends on the network.
If the completion dialog reports that installation failed (because of the network), manually download Package Control and place the downloaded file in the \Installed Packages folder under ST's data directory. After a short wait, ST will recognize the plugin automatically (ST may need to be restarted).
ST Data Directory Paths
On Windows, if a \data folder exists under ST's installation directory, ST automatically uses (or initializes) that folder as its data directory.
The path for ST3 is generally C:\Users\用户名\AppData\Roaming\Sublime Text 3, while the path for ST4 is generally C:\Users\用户名\AppData\Roaming\Sublime Text. ST first looks for the path corresponding to the current version; if it does not exist, it looks for the path of a lower version, and if neither exists, it creates and initializes one.
In Ubuntu 20.04.1, used by NOI Linux, the ST3 data directory is $HOME/.config/sublime-text-3, and the ST4 data directory is $HOME/.config/sublime-text; the specific rules are the same as on Windows.
You can use 首选项->浏览插件目录... to quickly view the \Packages folder under the data directory.
Installing the Chinese Localization Plugin
Press Ctrl+Shift+P again, enter Install, and press Enter (the full command is Package Contrl:Install Package). Wait for loading to finish; the following interface should then appear:
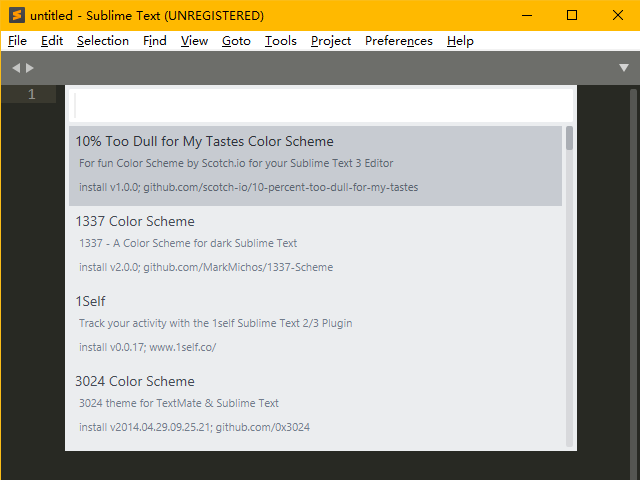
Enter Chinese, select ChineseLocalizations, and press Enter. Wait for the installation to finish; the interface will switch to Chinese automatically. On ST4, because the localization plugin has not been updated, some newly added menu items will be missing, but this generally does not affect editing.
Adjusting the Font
Go to 首选项->设置, and in the braces of the user settings on the right add a line "font_face": "字体名",. ST settings are stored in JSON format. Save the change; if the corresponding font is installed on the system, ST will switch to it automatically.
In general, if the criterion is simply the display of Chinese, Microsoft Yahei Consolas and Microsoft YaHei Mono are good choices.
Warning
Do not modify any settings (including plugin settings) in the default settings on the left, even if doing so works. This is not recommended; when the software or a plugin is updated, the default settings will be reset.
Installing Plugins and Themes
The method for installing plugins and themes is the same as the method for installing the Chinese localization plugin.
Press Ctrl+Shift+P, enter Install, and press Enter; then search for a plugin, theme, or color scheme.
Recommended plugins:
- BracketHighlighter: Enhances the original bracket highlighting and is essential.
- C++ Snippets: ST includes C++ code completion in a brace style that does not break lines. If you do not like ST's built-in brace-on-new-line style, install this plugin; it also adds some completions.
- C++ 11: Adds highlighting for the C++11 standard (not needed in ST4).
- SublimeAstyleFormatter: Astyle, for formatting code.
- Diffy: Press Ctrl+K&Ctrl+D to quickly compare the files open in the first and second views, line by line.
- ConvertToUTF8: Automatically detects file encodings and supports encoding conversion.
- SideBarEnhancements: Enhances the sidebar and is recommended.
- Transparency: Makes the window transparent.
Search for other plugins or themes as needed.
Some themes: 3
1337 (single color scheme), 3024 (single color scheme), Grandson-of-Obsidian (single color scheme), Seti_UI (single theme, with additional highlighting for formats such as git; recommended), Material Theme, Predawn, Agila, and Materialize.
To edit your own color scheme, visit tmTheme Editor.
In ST4, you can adjust the color scheme under Preferences->Customize Color Scheme, or the theme under Preferences->Customize Scheme.
Enabling Vi Mode
ST's developers provide an optional plugin called Vintage for Vi users; it simulates most Vi features.
How to Enable
The Vintage plugin is disabled by default. In the user settings under 首选项->设置, remove Vintage from the "ignored_packages" entry and save (do not delete the entire entry; remove only Vintage). INSERT MODE will then appear on the left side of ST's status bar, indicating that the Vintage plugin is enabled.
Alternatively, press Ctrl+Shift+P, enter Enable, select Package Control: Enable Package, and press Enter, then select Vintage. This method requires Package Control.
Related Configuration
To disable the arrow keys, add the following under 首选项->快捷键设置:
{ "keys": ["left"], "command": ""},
{ "keys": ["right"], "command": ""},
{ "keys": ["up"], "command": ""},
{ "keys": ["down"], "command": ""},
To make ST start in command mode, add the following under 首选项->设置:
"vintage_start_in_command_mode": true,
You can also use the key-binding settings to assign entry into command mode to any key (see Setting Key Bindings for details).
Differences from Vi
ST's Vintage plugin differs from Vi in several ways; some are listed here:
- Selecting text in insert mode does not enter visual mode; input is not interpreted as a command but directly replaces the text. Visual mode can be entered only from command mode.
- The commands
r,R,zA,za,zi,z=,@, and the commands using [、] or the " key do not exist. - Shortcuts using the Ctrl, Shift, and Alt keys remain ST shortcuts. For example, Ctrl+V pastes normally instead of entering visual mode.
- Command-line mode retains only
:e,:0,:$, and:s. - The
\and?commands automatically open the search box instead of searching by entering a word directly in the command. Numbers do not work at the same time. - The
qmacro-recording command starts ST's built-in macro recorder. After pressing Q, you must press another key to start recording, but the recorded macro is not bound to that key and must be started with Ctrl+Shift+Q. To save it, use工具->保存宏; the shortcut must be configured. - The
数字+.combination cannot be used.
Settings
Configuring ST
Configure ST under 首选项->设置; some useful options are listed here:
{
  // Font size
  "font_size": 11,

  // Font; optional, defaults to Consolas
  "font_face": "",

  // Convert tabs to spaces automatically
  "translate_tabs_to_spaces": true,

  // Indentation width
  "tab_size": 4,

  // Highlight the current line
  "highlight_line": true,

  // Automatically add a newline at the end of the file when saving
  "trim_trailing_white_space_on_save": true,

  // When text is selected, restrict searches automatically to the selection
  "auto_find_in_selection": true,

  // Disable plugins unlikely to be used in OI; adjust as needed
  "ignored_packages": [
    "ActionScript", "AppleScript", "ASP", "Batch File", "C#",
    "Clojure", "CSS", "D", "Diff", "Erlang", "Git Formats",
    "Go", "Graphviz", "Groovy", "Haskell", "HTML", "Java",
    "LaTeX", "Lisp", "Lua", "Makefile", "Matlab",
    "Objective-C", "OCaml", "Perl", "PHP", "Python",
    "R","Rails", "RestructuredText", "Ruby", "Rust",
    "Scala", "ShellScript", "SQL", "TCL", "Textile", "XML",
  ],

  // Relative line numbers; useful for fast jumps with Vintage
  "relative_line_numbers": false,
}
Setting Key Bindings
Configure them under 首选项->快捷键设置: find the function to modify on the left, copy it to the right, and edit the key binding.
For example, to change the build shortcut from Ctrl+B to F9 (unless the original shortcut is disabled, this actually adds another trigger), add the following under 首选项->快捷键设置:
// Change the build command to f9
{ "keys": ["f9"], "command": "build" },

// Change the shortcut for the original sort-lines command bound to f9 to shift+f9; since this function is rarely needed, this line may be omitted
{ "keys": ["shift+f9"], "command": "sort_lines", "args": {"case_sensitive": false} },
Configuring Plugins
Plugin settings can be found under 首选项->Package Setting->插件名; when modifying them, be careful not to change the default settings.
For example, here are some BracketHighlighter settings, edited under 首选项->Package Setting->BracketHighlighter->Bracket Setting:
{
  // Show a line at the start of each line between matching brackets, making the bracket range easy to find
  "content_highlight_bar": true,

  // Show matching brackets in the minimap
  "show_in_minimap": true,

  // Ignore the matching-range limit
  "ignore_threshold": true,

  // Highlight style: bold highlights a block, underline is a thick underline, and outline draws a surrounding border
  // color is the color; the default settings already include all supported colors
  // icon is the marker shown in the sidebar
  "bracket_styles": {
    "default": {"icon": "dot", "color": "region.yellowish", "style": "bold",},
    "unmatched": {"icon": "question", "color": "region.redish", "style": "outline",},
    "curly": {"icon": "curly_bracket", "color": "region.purplish",},
    "round": {"icon": "round_bracket", "color": "region.yellowish",},
    "square": {"icon": "square_bracket", "color": "region.bluish",},
    "angle": {"icon": "angle_bracket", "color": "region.orangish",},
    "tag": {"icon": "tag", "color": "region.orangish",},
    "c_define": {"icon": "hash", "color": "region.yellowish",},
    "single_quote": {"icon": "single_quote", "color": "region.greenish",},
    "double_quote": {"icon": "double_quote", "color": "region.greenish",},
    "regex": {"icon": "star", "color": "region.greenish",}
  }
}
Modifying and Adding
Sometimes parts of a plugin may not work as desired, or you may want to localize a plugin; in those cases, the plugin needs to be modified.
Plugins are stored in the \Installed Packages folder under the data directory.
The files there have the .sublime-package suffix, but are actually in .zip format and can be opened with an archive utility.
For example, to modify autocomplete, open the ST installation directory and edit the \Packages\C++ plugin's \Snippets\*.sublime-snippet files. To add completions, install C++ Snippets and modify or add files there (or create a new plugin, but do not add files directly to the built-in C++ plugin, or ST will not recognize them). ST must be closed whenever you save a modification, and you should make a backup beforehand; otherwise files may be lost.
Of course, any additions can be placed under \Packages\User\ in the data-directory path; this is always supported.
For example, a file-template completion can be written as follows:
<snippet>
  <description>template_code</description> <!-- This content previews the completion -->
  <content><![CDATA[#include <cstdio>
using namespace std;

int main() {
  freopen("${1:file name}.in", "r", stdin);
  freopen("$1.out", "w", stdout);
  ${0:/* code */}
  fclose(stdin);
  fclose(stdout);
  return 0;
}]]></content>
  <tabTrigger>code</tabTrigger> <!-- This content is the completion trigger text -->
  <scope>source.c++</scope> <!-- This content is the language to which the completion applies -->
</snippet>
The following lists some file suffixes and their uses. For detailed plugin-development tutorials, see the community documentation and the official documentation:
| Suffix | Use |
|---|---|
| .sublime-build | Build-system file |
| .sublime-completions | Filename completion list (usually header files) |
| .sublime-syntax | Syntax-highlighting file |
| .sublime-settings | Settings file |
| .tmPreferences | Preference list file |
| .sublime-keymap | Key-binding settings file |
| .sublime-snippet | Code-completion file |
| .sublime-commands | Command-definition file |
| .sublime-menu | ST UI file, including the sidebar and top menu bar (the main localization target) |
Because plugin updates directly overwrite the original files, backing up modified files is recommended.
Editing
Setting the Syntax
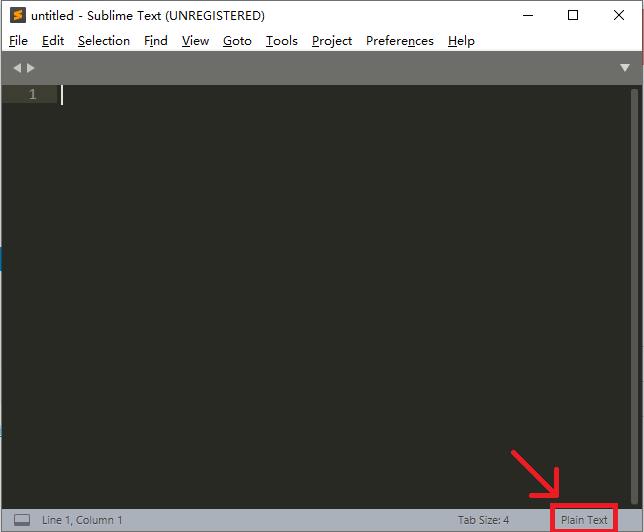
Press Ctrl+Shift+P and enter the syntax, or click Plain Text in the lower-right corner and change it to the desired language. The syntax can also be set under 视图->语法.
Keyboard Shortcuts
ST supports compound shortcuts. For example, Ctrl+K&Ctrl+Backspace means pressing Ctrl+K first and then Ctrl+Backspace.
Some shortcuts:
| Key | Command |
|---|---|
| Ctrl+X | Cut the current line |
| Ctrl+Shift+K | Delete the line |
| Ctrl+Enter | Insert a line below |
| Ctrl+Shift+Enter | Insert a line above |
| Ctrl+Shift+Up | Move the line up |
| Ctrl+Shift+Down | Move the line down |
| Ctrl+L | Select a line; repeat to select multiple lines downward |
| Ctrl+D | Select a word; repeat to select multiple identical words and enter multiple-selection mode (for fast batch changes) |
| Ctrl+M | Jump to the matching bracket |
| Ctrl+Shift+M | Select the content inside brackets (excluding the brackets); repeat to include the brackets |
| Ctrl+K&Ctrl+K | Delete to the end of the line (compound shortcut; Vim mode is recommended instead) |
| Ctrl+K&Ctrl+Backspace | Delete to the beginning of the line (compound shortcut; Vim mode is recommended instead) |
| Ctrl+] | Indent the current (selected) line |
| Ctrl+[ | Unindent the current (selected) line |
| Ctrl+Shift+D | Duplicate the current line and insert it below |
| Ctrl+J | Join the next line to the current line |
| Ctrl+Shift+V | Paste and indent (for pasting a whole block of code) |
| Ctrl+K&Ctrl+Shift+V | Paste from history (compound shortcut; changing it to Ctrl+Alt+V is recommended) |
| Ctrl+Alt+Down | Move the cursor down while retaining the cursor on the current line (enter multiple-selection mode) |
| Ctrl+Alt+Up | Move the cursor up while retaining the cursor on the current line (enter multiple-selection mode) |
| Ctrl+R | Jump to any symbol in the file (function or type definition) |
| Ctrl+Shift+R | Jump to any symbol in the project (function or type definition) |
| Ctrl+P | Jump to any file (previously opened or present in the project) |
| ~ | Change the case of the selected content |
Autocomplete
ST provides rich completion features. Possible completions appear below the cursor; press Tab or Enter to complete them. In ST4, after completing a non-Snippet completion, pressing Tab again lets you continue selecting a completion that contains the previous completion as a substring.
Snippet completions generally contain editing fields. After completion, the field is automatically selected for replacement. For a complex completion such as for with multiple fields, press Tab again after finishing one field to complete the next. To trigger completion inside an editing field, use Enter (ST4 also allows Tab).
If autocomplete does not appear, fix it as follows:
-
Check whether the language has been switched; ST creates new files as Plain Text by default.
-
Go to
首选项->设置and add these two lines:
"auto_complete": true,
"auto_match_enabled": true,
Multiple Selection
Hold Ctrl and click with the mouse to add a cursor on the screen. Ctrl+Alt+Up and Ctrl+Alt+Down add cursors directly on adjacent lines. Any editing operation is applied to all cursors simultaneously.
Find and Replace
Ctrl+F searches, F3 finds the next match, Shift+F3 finds the previous match, and Ctrl+H replaces.
The five search options are regular-expression matching, case sensitivity, whole-word matching, wrap-around search, and searching within the selected text.
It is recommended to set "auto_find_in_selection" to true in the preferences. When more than one word is selected, searches will then automatically be restricted to the selected text.
Demonstrations
Hot Exit
Try typing some content in ST and close the entire application directly. ST closes without any prompt; when you reopen it, no data will be lost as long as the computer has not been restored to an earlier state.
Multiple Selection
To change every bok in the following code to book, place the cursor in any bok and hold Ctrl+D to select them quickly.
int check() {
  book[1] = 1, book[2] = 1, book[3] = 1, bok[1] = 1, bok[2] = 1, bok[3] = 1,
  bok[4] = 1, bok[5] = 1;
}
To change everything after the equals sign in the following file to "good", place the cursor before aaa on the first line, press Ctrl+Alt+Down five times, then press Ctrl+D and type good.
Alternatively, select "a and hold Ctrl+D, then press Right and Ctrl+D, and type the replacement.
s[1] = "aaa";
s[2] = "aab";
s[3] = "aac";
s[4] = "good";
s[5] = "aae";
s[6] = "aaf";
To add parentheses around every a + b below, select one a + b, hold Ctrl+D, and type (; if a region is selected, typing any left-parenthesis key adds matching parentheses around both sides of the region.
a + b*a + b*a + b
Find and Replace
To change everything after the equals sign in the following file to "good", you can also use Ctrl+H: enable regular expressions, enter ".*", and replace it with "good".
s[1] = "aaa";
s[2] = "aab";
s[3] = "aac";
s[4] = "good";
s[5] = "aae";
s[6] = "aaf";
To add semicolons to the following code, select the region, enable regular expressions, enter \n, and replace it with ;\n.
int main() { int a, b cin >> a >> b cout << a + b return 0}
Macro Recording
To add semicolons to the following code, press Ctrl+q to start recording a macro, then press End, ;, and Down in sequence, and press Ctrl+q to stop recording (the lower-left corner does not display the recording status throughout, but recording is active). Then repeat with Ctrl+Shift+q.
int main() {
  int a, b
  cin >> a >> b
  cout << a + b
  return 0
}
If Vintage Is Enabled
After executing Ctrl+Shift+q once, press Esc to enter command mode and type .. (the . command repeats the ST3 command).
For details on saving macros and binding keys, see the community documentation.
Compiling and Running
ST's compilation environment is already configured, so it can be used directly.
On Windows, add the directory containing g++ to the environment variables, then restart ST.
Compiling
Press Ctrl+B to compile. The first time, you must choose a build system; select C++ Single File (compile) or C++ Single File - Run (compile and run).
Modifying Compiler Options
ST's default compiler command is g++ "${file}" -o "${file_path}/${file_base_name}". To modify the compiler options, create a new build system.
Go to 工具->编译系统->新建编译系统… and enter the following between the braces:
// Adjust the compiler options as needed
// Compile and run
"shell_cmd": "g++ -Wall \"${file}\" -o \"${file_path}/${file_base_name}.exe\" && \"${file_path}/${file_base_name}.exe\"",

// This line lets ST3 display errors graphically; remove it if you prefer reading g++ output
"file_regex": "^(..[^:]*):([0-9]+):?([0-9]+)?:? (.*)$",
After saving, press Ctrl+Shift+B to switch build systems. This configuration compiles and runs the program in an external CMD.
The saved file is \Packages\User\编译系统名.sublime-build under the data-directory path and can be modified repeatedly.
Running
If you select C++ Single File - Run (compile and run) when compiling, or configure automatic running, the compilation-information window that pops up below should display nothing (unless there is a compilation error), because ST's compilation-information window is actually a terminal where input can be entered directly.
After execution ends, the program's running time is displayed. It is measured from pressing Ctrl+B until all CMD commands finish, so it includes compilation time and input time, as well as the time to start and close CMD when running in an external CMD.
Warning
This window cannot receive F6 or Ctrl+Z. If the program reads until the end of a file, use file input or configure it to run in an external CMD.
Debugging
You can install a plugin to give ST graphical gdb debugging support, but relying on a plugin for gdb debugging is not recommended.
A better approach is to add the relevant commands while configuring the build system and start gdb for command-line debugging externally.
Miscellaneous
- Drag a folder into ST and press Ctrl+K&Ctrl+B to open the sidebar, allowing quick switching between files.
- Make good use of jump features, especially Ctrl+P for jumping between files and Ctrl+R for jumping to functions.
- ST supports git4.
- All ST configuration is stored under the data directory and can be packaged freely, but registration information cannot be used on multiple computers.